- Renault (1969-73)
- Simca (1969-70)
- Volvo (1968-73)
CHANGES, CAUTIONS, CORRECTIONS
BATTERY INSTALLATION & OTHER ELECTRICAL REPAIRS CAUTION - Reverse polarity or excessive voltage will result in extensive damage to alternator system. Note the following to prevent damage:
Battery Installation - Negative battery terminal must be connected to ground (negative ground system) and positive terminal must be connected to starter. DO NOT reverse battery leads.
Battery Charging - If a Quick Charger is used, both battery cables must be disconnected from the battery. DO NOT use a Quick Charger to provide starting voltage.
Circuit Interruption - The battery must NEVER be disconnected while alternator is running.
Alternator Removal - Always disconnect battery ground before replacement of alternator.
High Voltage - DO NOT use a high voltage source to test diodes.
Booster Battery (For Engine Start) - Booster battery must be connected with negative lead to negative battery terminal and positive lead to positive terminal. DO NOT reverse battery leads.
Field Terminal - NEVER ground field energizing terminal on alternator, regulator, or connecting lead.
Voltage Regulator - NEVER operate voltage regulator without a good ground connection or immediate damage will result.
DESCRIPTION
SEV Motorola alternators are conventional three-phase, self rectifying type alternators. Six silicone diodes (three positive and three negative) are used to rectify AC currrent. The 35 ampere alternator use one isolation diode mounted in a heat sink attached to end frame. The 55 ampere unit incorporates two isolation diodes (connected in parallel) which are mounted on exterior. Isolation diodes (when used) have two functions: They prevent battery from discharging through regulator and alternator field, and they provide a simple means of operating charge warning lamp.
APPLICATIONModel *Part No.
Renault
R-12
1971-72.....................7122-8302
1973.....................77 00 559 308
R-15
1972-73...............77 00 532 831
R-16
1969-70....................** A 12/30
1971-72...............77 00 500 295
R-17
1972.....................77 00 529 484
1973.....................77 00 559 309
Simca
1204
1969-70..................*** S 34266
Volvo
140 Series
1968-71.....................14V-26641
1972................................419420
1973...................................33525
164
1969-71.....................14V-34833
1972.................................419420
1973...........................14V-34833
1800
1972.................................460085
1973...................................33525
* - Each number listed is either Renault part number, Simca part number or Volvo part number.
** - Type Number.
*** - Standard, optional part number is S 30479
SPECIFICATIONS
Nominal OutputApplication Amps. @ RPM Volts
7122-8302..................30 @3000.............13.2
77 00 559 308............30 @ 3000.............13.2
77 00 532 831............30 @ 3000.............13.2
A 12/30......................35 @ .... ................. ....
77 00 500 295............. ............ ................13.2
S 34266....................... ........... ................. ....
14V-26641.................35 ... .......................13
419420.......................35 @ 5000.............14.2
33525.........................48 @ 3000.............13.2
14V-34833.................48 @ 3000...............14
460085.......................55 @ 4000...............14
* - Charging Voltage
Coil Resistance (Ohms)
Application Rotor Stator
7122-8302.................5.2......................... *
77 00 559 308...........5.2......................... *
77 00 532 831...........5.2......................... *
A 12/30.....................5.2......................... *
77 00 500 295........... ... ......................... ..
77 00 529 484........... ... ......................... *
77 00 559 309...........5.2......................... *
S 34266..................... ... ......................... ..
14V-26641................5.2......................... *
419420......................5.2......................... *
33525........................3.7......................... *
14V-34833................3.7......................... *
460085......................3.7......................... *
* - See stator testing in Overhaul.
TESTING
ON CAR TEST
Connect alternator as shown in illustration, Check that current through field winding (rotor) is 3.5 amps. If
 |
| ALTERNATOR TESTING CIRCUIT |
OVERHAUL
DISASSEMBLY
1) Release two screws holding brush holder and remove isolation plate (if equipped). Pull out brush holder.
2) Hold pulley with belt in a vise with soft jaws, and remove the nut and washer. Lift off pulley, fan, key and spacer washer.
3) Remove nuts and washers on terminal 61 and the corresponding terminal on the other side of isolation diode. Mark drive shield, stator and slip ring end shield for correct reassemly position.
 |
| CHECKING BRUSH HOLDER |
4) Remove four attaching screws. Remove rotor and drive end shield with help of two screwdrivers, which are inserted in two sockets between stator and drive end shield. CAUTION - The screwdrivers may not be inserted deeper than 1/14" (2 mm) otherwise stator may be damaged.
5) Release three screws holding support plate of drive end bearing. Release bearing by knocking end of shaft against a piece of wood.
6) Remove nuts and washers for the diode holder for negative diodes. Remove stator and diode holders for slip ring end shield.
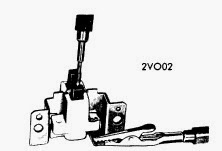
 |
| S.E.V. MOTOROLA ALTERNATOR (TYPICAL) |
TESTING
Stator - Check stator for short-circuiting. If one or more of the coils are burned, there must be a short-circuit in stator. Connect test lamp (12 volt, 2-5 watt) between stator plates and terminal on stator (see illustration). If lamp lights, isolation between stator winding and stator plates must be burned, in which case stator should be replaced. NOTE - Use only test lamp as specified. DO NOT use a 110-volt or 220-volt test lamp on this or any alternator test procedure
 |
| STATOR CHECK |
Diodes - Check diodes with a diode tester. If any of the rectified diodes are shorted or open, the diode holder must be replaced. If any isolation diode is faulty, replace holder, complete with isolation diodes. If diode tester is not available, diode should be unsoldered and tested with an ohmmeter. Diodes should show high resistance in reverse direction and low resistance in flow direction.
Rotor - Check to make sure slip rings are not dirty or burned. Check winding for breakage or damage isolation. Measure resistance between slip rings. It should be as specified. If winding is faulty, rotor must be replaced. NOTE - It is recommended that bearings be replaced whenever alternator is disassembled.
Brush Holder - Connect a test lamp between the brushes. Lamp should not light. Next connect test lamp between "DF" terminal and the "+" brush. Lamp should give steady light even if brush or terminal cable is moved (see illustration). Connect test lamp between brush holder frame and "-" brush. Lamp should give steady light. If test results are not satisfactory or brush length is less than 3/16" (5 mm), replace brush holder. NOTE - Brush length is measured between brush contact surface and holder, with brush resting against spring.
PARTS REPLACEMENT
Diodes - Mark leads connecting stator to diodes, then unsolder leads. Place new diode holder in exact position of holder being replaced. Solder new leads, holding with pliers (this is to conduct heat from soldering point, to avoid damaging new diode). Use a minimum 100-watt, well-heated soldering iron. Never change places of diode holders. Positive holder is isolated from frame by means of isolation washers and sleeves and its diodes are marked in red. Negative diode holder is not isolated and its diodes are marked in black.
REASSEMBLY
Alternator is reassembled by reversing order of disassembly, noting the following: Rotor must be pressed into drive end shield. Connect a test lamp between "B+" terminal and alternator frame, then reverse connections. Lamp should light only in one direction. After completion of reassembly, test run alternator on bench, using same procedure as described for On Car Testing.