Wednesday, August 22, 2012

MGB & MGC 1968-74 Repair Manual

Models Covered:
MGB & MGB/GT (1968-74)
MGC & MGC/GT (1969)

DESCRIPTION
Rear axles are hypoid design with center line of pinion set below centerline of ring gear. The axle shafts can be serviced without removing axle from vehicle. All differential adjustments are performed using shims. No adjustments for axle shaft end play is necessary. A collapsible spacer is used on drive pinion shaft.
AXLE RATIO AND IDENTIFICATION
Only one basic axle design is used on these models. To determine axle ratio, divide number of ring gear teeth by number of pinion gear teeth.
REMOVAL AND INSTALLATION
AXLE SHAFT AND BEARINGS
1) With vehicle raised and supported, rear wheel remove and handbrake released, remove contersunk screws (disc wheels) or nuts (wire wheels) securing brake drum. Top off drum. It may be necessary to loosen brake adjusters if shoes hold drums. Remove cotter pin and unscrew slotted axle shaft nuts and remove hub. Disconnect brake cable and hose.
2) Remove brake backplate, then remove oil seal collar bearing hub cap and oil seal from axle shaft. Remove axle shaft using suitable tool and press bearing from shaft. To install, repack bearing with grease and reverse removal procedure. Use suitable tool to drift axle shaft into position. Lubricate and install new oil seal with lip facing inwards.
PINION FLANGE AND SEAL
1) Raise and support rear of vehicle, remove wheels and brake drums. Drain rear axle. Mark propeller shaft and pinion flange for correct reassembly and disconnect propeller shaft. Using suitable tool, measure and record torque required to rotate pinion. Using tool to prevent pinion rotation, remove flange retaining nut and washer, withdraw pinion flange. Extract and discard oil seal.
2) Grease edge and sealing lip of new oil seal and install seal flush with axle housing. Install pinion flange and washer, and screw on retaining nut gradually until resistance is felt. Rotate pinion to settle bearings and measure torque required to rotate pinion. If reading obtained is less than value obtained during disassembly, tighten nut a VERY small amount, resettle bearings and recheck torque. Repeat this procedure until a reading equal to previous reading, but not less than 4-6 INCH lbs. (4-7 cmkg) is obtained. CAUTION - Preload build up is rapid, tighten nut with care. If a torque reading in excess of 6 INCH lbs. (7 cmkg) is exceeded, axle must be dismantled and a new collapsible spacer installed. Continue reassembly reverse of disassembly procedure.
AXLE ASSEMBLY
1) Rear rear of vehicle and mark propeller shaft and flange for correct reassembly. Disconnect propeller shaft. Remove nuts and washers securing each end of rebound straps to anchor pins on axle and remove straps. Disconnect handbrake at operating levers and remove cable clamp from housing. Remove nut securing brake balance lever to pivot on axle housing. Disconnect shock absorber from rear spring clamp plate.
2) Disconnect brake line and release exhaust pipe from exhaust manifold and supporting brackets, lower exhaust pipe assembly. Remove nut and washer from each spring front anchor pin. Support axle housing and remove rear shackle plates, brackets and rubber bushings. Lower axle support until axle and spring assembly rests on wheels. Remove front anchor pins and roll assembly from beneath vehicle to reinstall, reverse removal procedure.
OVERHAUL
DISASSEMBLY
1) Drain and remove axle from vehicle. Remove axle shafts and hubs. Remove differential cover and mark each differential bearing cap before removal to ensure correct replacement. Remove bolts and bearing caps. Before differential assembly can be removed from axle housing, housing must be stretched with a suitable stretching tool (18G-131 C). Do not stretch housing more than is absolutely necessary or housing may be damaged. Maximum stretch is .012" (.3 mm) or 9 flats of tool 18G-131 C. Pry differential assembly out of housing using care not to damage case or apply leverage on stretcher. Release housing stretcher
2) Bend back locking tabs and remove ring gear bolts and ring gear. Drive out pinion shaft pin and rmeove shaft. Turn differential gears by hand until pinions are opposite operating in differential cage and remove pinions and thrust washers. Remove differential gears and thrust washers, if necessary remove differential inner bearing races using suitable tools.
3) Before removing pinion measure preload; if this is zero, install new pinion bearings. Hold pinion flange and remove pinion nut and washer. Remove flange by tapping with soft hammer. Remove pinion by pressing out, do not drive out. Using suitable tools, remove front and rear bearing outer  races form axle housing. As front race is removed, oil seal will come out with it. Remove rear bearing inner race from pinion.
REASSEMBLY AND ADJUSTMENT
Drive Pinion Depth - 1) Install bearing outer races in axle housing using suitable tools. Using a dummy pinion (18G-191H), install inner race of bearing on dummy and plate in housing without collapsible spacer or oil seal. Install inner race of front bearing. NOTE - A standard pinion head spacer of .208" (5.3 mm) is incorporated in dummy pinion. Install pinion flange and tighten nut gradually until a bearing preload figure of 10-20 INCH lbs. (11-20 cmkg) is obtained.
2) Clean dummy pinion head and position dial indicator foot on pinion head and zero indicator. Move indicator until foot of gauge rests on center of differential bearing bore and route indicator reading. Repeat this procedure on opposite bearing bore and average the two figures. The reading shown on indicator will be amount of correction necessary from standard spacer of .208" (5.3 mm). If indicator reading is negative, reduce spacer thickness by this amount and visa versa.
3) Allowance must also be made for pinion depth marked on pinion head in a rectangular bracket. If marking is positive, reduce washer thickness by equal amount and visa versa. A tolerance of .001" (.03 mm) is allowed in thickness of washer finally installed. Remove dummy pinion.
Pinion Bearing Preload - 1) Install washer of thickness calculated above under pinion head. Install pinion inner bearing race. Insert pinion into case and install collapsible spacer with small diameter towards shoulder of pinion head. Support head of pinion and press outer bearing onto pinion using care not to compress spacer .Grease edge and sealing lip of seal and install seal flush with axle housing. Install flange, washer and nut.
2) Tighten flange nut slowly until spacer starts to collapse. Rotate pinion to settle bearings and check pinion preload. Continue tightening very small amounts between each preload check until specified preload is obtained. CAUTION - Bearing preload is rapid. If preload torque of 24 INCH lbs. (30 cmkg) is exceeded, pinion must be dismantled and a new collapsible spacer is installed.
Side Bearing Preload - 1) Assemble each inner and outer bearing race to differential assembly. Using ring gear setting tools (18G-191, 18G-191 F & 18G-191 J) place differential assembly onto jig and load ring gear assembly (see illustration). Spin unit to settle bearings. Standard measurement of bearing bores is 7.243" (183.98 mm). Any excess machined from bores will be marked A and B on axle casing. The A and B tolerances added to standard measurement will determine overall dimension, see example
EXAMPLE
  Differential case standard....................... 7.243 (183.98 mm)
  PLUS value "A" stamped on case.......... .001" (.025 mm)
  PLUS value "B" stamped on case.......... .002" (.038 mm)
  Total distance between bores................ 7.246" (184.05 mm)
2) Clean head of jig pillar and place dial indicator on pillar and zero indicator on pillar head. NOTE - Pillar is standard height of differential to settle bearings and move arm of dial indicator to machined face of jig and take a reading. Add this variation to the standard height to obtain total width of differential assembly. For example:
EXAMPLE:
  Differential assembly standard....................  6.972" (177.10 mm)
  PLUS indicator reading.............................    .008" (.203 mm)
  Total differential assembly..........................  6.980" (177.30 mm)
3) Subtract total width of differential assembly, found in 2) above, from total distance between the bores, found in 1) above. To this value, add specified bearing preload value and divide the result by 2 to obtain shim thickness equal values for both sides of assembly
EXAMPLE 
  Total distance between bores...................... 7.246" (184.05 mm)
  MINUS total differential assembly............... 6.980" (177.30 mm)
  Result......................................................... .266" (6.75 mm)
  PLUS bearing preload................................ .004" (.102 mm)
  Total shim thickness.................................... .270: (6.86 mm)
  Shim each side............................................ .135" (3.43 mm)
Backlash Adjustment - 1) Correct figure for backlash to be used with any particular ring and pinion is etched on rear face of ring gear. Increase shim thickness on opposite side to ring gear by this amount and decrease shim thickness on ring gear side by same amount.
EXAMPLE
  Calculated shim thickness............................  .135" (3.43 mm)
  MINUS backlash value...............................  .008" (.203 mm)
  Ring gear side shims....................................  .127" (3.23 mm)
  Calculated shim thickness............................  .135" (3.43 mm)
  PLUS backlash value..................................  .143" (3.62 mm)
2) Install differential in axle housing. Replace bearing caps and tighten bolts. Set up dial indicator to accurately measure backlash of ring gear. If backlash is not at value etched on ring gear, move shims from side to side to obtain correct value. A movement of .002" (.051 mm). shim thickness from one side of differential to the other will produce a variation in backlash of about .002" (.051 mm). Ensure absolute cleanliness during above operation to ensure accuracy. Continue installation in reverse of the removal procedure.


Toyota xB/BB Scion Repair Manual

Manufacturer: Toyota/Scion
Model: Scion xB / BB
Year: 2004

Contains the following information and repairs for:

  • Introduction
  • Preparation
  • Service Specifications
  • Diagnostics
  • Engine Control System
  • Fuel
  • Emission Control
  • Engine Mechanical
  • Exhaust
  • Cooling
  • Lubrication
  • Ignition
  • Starting and Charging
  • Front and Rear Suspension
  • Tire and Wheel 
  • Drive Shaft
  • Brake and Parking Brake
  • Automatic and Manual Transmission
  • Clutch
  • Steering Column
  • Power Steering
  • Heater and Air conditioning
  • Supplemental Restraint System
  • Seat Belt
  • Lighting
  • Wiper and Washer
  • Audio and Visual System
  • Wiring
  • Communication System
  • Windshield
  • Instrument Panel
  • Seat
  • Theft Deterrent and Door Lock
  • Engine Hood and Doors
  • Exterior and Interior Trims
  • Vehicle Control System
  • Maintenance
  • Wiring Manuals
  • Installation Manuals
File Size: 65 MB
File Type: PDF, RAR

Mercedes-Benz 1968-72 Split Housing

Models Covered:

  • 280 Models (1968-72)
  • 300 Models (1968-72)
DESCRIPTION
Axle assembly is of split case design with hypoid type gears in which centerline of drive pinion is mounted below centerline of ring gears. Remove case half of permits inspection and service of differential. All adjustments, except pinion bearing preload, are performed using shims. Pinion bearing preload is set using a collapsible spacer. Some models use a limited slip differential, either as standard or optional equipment.
AXLE RATIO AND IDENTIFICATION
All models 1968-72 Mercedes Benz 280 and 300 models use the split case rear axle with single pivot type rear suspension. Some models also have limited slip differentials. To determine axle ratio, divide number of ring gear teeth by number of pinion gear teeth.
REMOVAL AND INSTALLATION
AXLE SHAFT AND BEARINGS
Removal - 1) With vehicle raised and rear wheels removed, remove brake caliper and rotor, then remove parking brake shoes and brake backing plate. Attach a suitable tool (100 589 02 33 00) to flange of rear axle shaft and knock shaft out of supporting tube.
2) Insert axle shaft into suitable assembly plate (136 589 05 31 00) and remove slot nut using suitable slot nut spanner (136 589 09 07 00). Pull of grooved ball bearing of self aligning bearing with suitable puller (136 589 20 33 00). Press sealing ring out of brake backing plate and support tube.
Installation - 1) Coat circumference of sealing ring with sealing compound and press into brake backing plate. Coat contact surface of sealing ring with molybdenum disulphide paste and carefully slide backing plate in position. Press grooved ball bearing or self-aligning bearing on rear axle shaft. Place lock washer with flange against inner race of bearing and make sure that it is perfectly seated. Install and tighten slot nut.
2) Coat new seal with sealing compound and install support tube. Fill cavity between inner and outer sealing rings and bearing seat with bearing grease. Install axle shaft into support tube. NOTE - When installing self-aligning bearings, insert fixture 111 589 08 63 00 between brake backing plate and flange of axle shaft. This will locate bearing in its correct position. Screw bake backing plate to support tube and install brake shoes, rotor and caliper. Check axle oil level.

PINION FLANGE AND SEAL
Removal - 1) Drain oil from rear axle and place supporting tubes in horizontal position. On models with air suspension disconnect and fold down torsion bar. Loosen exhaust system joint and remove. Remove shield plate and loose universal shaft intermediate bearing on frame; do not remove bolts completely. Loosen universal clamping nut.
2) On all models, mark propeller shaft for proper installation and disconnect at pinion flange. Unscrew flange slot nut using suitable spanner wrench (111 589 00 07 00) and holding flange with suitable tool (111 589 02 07 00). Pull flange from pinion. Remove seal from drive axle housing.
Installation - 1) Coat new seal circumference with sealing compound and inner into housing. Coat mating surface flange with molybdenum sulphide paste and slide flange drive pinion, noting markings for correct alignment. While holding flange, tighten slot nut until a torque of 23-29 INCH lbs. (20-25 cmkg) is required to rotate entire drive axle assembly at pinion flange. NOTE - When checking torque, ensure that support tubes are horizontal and that brake pads and shoes do not drag. If torque exceeds specifications, a new collapsible spacer must be installed.

2) Secure slot nut and install propeller shaft. Slightly  tighten joint intermediate bearing on frame. Fill drive axle with lubricant and move vehicle back and forth several times. Tighten clamping nut on propeller shaft and tighten intermediate bearing. On models with air suspension, mount shield exhaust system and reconnect torsion bar.
AXLE ASSEMBLY
Removal - 1) On models with air suspension, leave knob for control valve in "driving position" and raise vehicle. Bleed off all air from supply tank and check by finger pressure that rear bellows are free of air. Loosen hex bolts attaching supporting piston-to-thrust rods. Disconnect connecting rod for rear level control valve and remove ball pin. Remove torsion bar and proceed with balance of drive axle removal.
2) On all models, remove exhaust system. Remove heat shield, if equipped. Disconnect brake cable control on frame and compensating lever. Remove propeller shaft. On vehicles with conventional suspension, remove compensating spring and rear springs. On air suspension vehicles, unscrew supporting piston from radius arm and leave piston in bellows. On all models, disconnect brake hose from calipers.
3) Loosen radius arm-to-chassis mount. Unscrew bolts on front link of cross strut and remove front link. Loosen rear link and push cross strut toward rear. Loosen mounting of brake hold down on chassis by unscrewing nut inside vehicle under rear seat and pulling out bolt. Raise support tubes slightly and disconnect lower shock absorber mounts.
4) Raise support tubes until almost horizontal and attach suitable holding clamp (111 589 07 61) to rear axle to prevent tubes from drooping. Place jack with suitable holding fixture (111 589 05 61) under axle housing. Unscrew bolt on rubber mount of rear axle suspension carrier from inside trunk. Lower rear axle and remove from vehicle, making sure support tubes are not allowed to droop.
Installation - 1) Check that dimension "a" (see illustration) between pinion flange and rear axle suspension carrier is 6.22±.04" (158±1 mm) and that carrier is at right angles to left side support tube. Insert suitable conical installation mandrel (111 589 00 61) on rear axle suspension carrier, raise axle and guide carrier into rubber mounts. Correctly position clamping plate and screw in bolt. Install circlip, lower jack and tighten bolt. Remove holding clamp.
2) Install shock absorbers and attach cross strut with both links to carrier. Attach radius arm to chassis and reconnect brake lines. Bleed brakes. On vehicles with air suspension, attach supporting piston to radius arm and make sure set pin for locating piston is correctly mounted in radius arm. Also check seat of supporting piston in bellows. On conventional suspension models, install rear springs and compensating spring.
3) Mount lever for brake hold down to frame side member. Install propeller shaft and slightly tighten intermediate bearing nuts. Check axle oil level and lower vehicle. Move vehicle back and forth several times, then tighten clamping nut on propeller shaft and intermediate bearing nuts. Attach heat shield (if equipped) and install rear brake cables and exhaust system. Install torsion bar and adjust parking brake.
4) On vehicles with air suspension, place control valve lever in zero position and fill system with compressed air. Lower vehicle carefully. CAUTION - Vehicle does not have full ground clearance. Adjust rear ride height. On vehicles with conventional suspension, make sure rear axle tracks correctly.
OVERHAUL
DISASSEMBLY
1) Remove both struts and axle shafts. Unscrew nut of wedge screw which locks connecting bolt in axle housing. Pull rubber sleeve from housing. Loosen nut on connecting bolt and clamping screw on cover of axle housing. Knock connecting bolt out toward rear using suitable mandrel (180 589 08 39 00) and remove right side support tube. Loosen clamping screw and remove right side slip joint. Remove oil cooling pipe and unscrew left side support tube from housing. Remove differential.
2) Pull bearing outer race out of left support tube using suitable puller (108 589 01 33 00). Remove backlash shim from tube assembly. Unlock threaded ring and screw out of axle housing using suitable wrench (108 589 00 07 00). Knock outer race of bearing out of housing using suitable driver (108 589 00 43 00).
3) Remove slot nut securing pinion flange and press pinion out of housing using suitable press (111 589 12 61 00) complete with collapsible sleeve. Remove flange and unscrew from cover. Remove bearing from housing. Press rear bearing outer race out of axle housing using press tool. Remove shim. Pull outer race of front bearing out of housing using suitable tool (111 589 12 61 00). NOTE - This tool will pull race off over tapered rollers.
4) To disassemble case assembly, unscrew bolts attaching ring gear case and force gear off. Pull both bearing off case using suitable puller (187 589 05 33 00). On standard differentials, remove coil spring lock securing pinion shaft, knock out shaft and remove pinions with spherical washers, side gears with bearing ring and thrust washer. On limited slip differentials, knock out coil spring lock or plate spring and remove pinion shaft. Remove pinion gears with washers, then remove right side gear. Now remove left side gear and clutch discs.
REASSEMBLY AND ADJUSTMENT
Case Assembly (Standard Differential) - 1) Inspect all components for wear or damage and be sure to replace pinions, thrust washers, polyamide bearing ring and spherical washers which have run hot or seized. NOTE - An oversized polyamide bearing ring is available which will have to be matched .0008" (.02 mm) larger than bore in case.
2) Place thrust washer and polyamide bearing ring on side gear and insert into case. Insert other side gear in case. Insert pinions with spherical washers into case and insert suitable assembly mandrel (108 589 00 61 00) through case and pinions. Screw joint yoke to right side gear and rotate side gears using torque wrench. Side gears should have no backlash and require a torque value of 130-174 INCH lbs. (150-200 cmkg) to rotate. If torque value is not obtained. Insert thicker or thinner thrust washers as necessary to achieve torque.
3) Knock in new pinion shaft and secure with new coil spring lock. Carefully clean bore of ring gear and seat on differential housing. This process will be aided by heating ring gear to 140-158°F (60-70°C) and tapping lightly with rubber hammer. Insert and tighten ring gear bolts in a crosswise pattern. Press inner races of bearing on case using suitable sleeve (108 589 01 43 00).
Case Assembly (Limited Slip Differential) - 1) Inspect components for wear or damage and be sure to replace pinions, thrust washers and spherical washers which have run hot or siezed. Also, if friction discs need to be replaced it is recommended that the entire clutch pack be replaced. Place friction disc with lining on one side on side gear so lining faces contact surface of side gear. Coat five friction discs without lining and four friction disc with lining on bot sides with molybdenum disufphide paste and place on side gear in sequence of: without lining, with lining, etc.
2) Insert left side gear, without pressed-in nut, along with friction discs into case of ring gear end. Insert right side gear with pressed-in nut into case. NOTE - Make sure friction discs are arranged in correct sequence and that lugs of discs without lining engage in slots in case. Insert pinions with spherical washers into case and slide suitable assembly mandrel (108 589 00 61 00) through case, pinions and washers. Screw joint yoke to right side gear and rotate side gears using torque wrench. Side gears should have no backlash and require a torque of 217-304 INCH lbs. (250-350 cmkg) to rotate. If torque value is not obtained, insert thicker or thinner thrust washers as necessary to achieve torque.
3) Knock in pinion shaft and secure with new coil spring lock or plate spring. Carefully clean bore of ring gear and seat on differential housing. This process will be aided by heating ring gear to 140-158°F (60-70°C) and tapping lightly with rubber hammer. Insert and tighten ring gear bolts in a crosswire pattern. Press inner races of bearings on case using suitable sleeve (108 589 01 43 00).
Drive Pinion Depth - 1) With dial indicator plunger of device 116 589 00 23 00 depressed about .12" (3 mm) by gauge block 108 589 01 23 00 part 21, zero dial indicator. Press inner tapered roller bearing on drive pinion and place bearing outer race on roller cage of bearing. Insert pinion assembly into measuring device and not indicator reading (example: 1.50 mm).
2) Now note adjustment value engraved on pinion shaft in tenths of millimeters (example: +20 = +.20 mm). Now from value measured above, add adjustment value if plus and subtract value if minus. example: 1.50 + .20 = 1.70 mm). Insert gauge block holder into axle housing and screw on gauge block. Insert dial gauge holder 108 589 01 23 00 part 10 into adjusting gauge 108 589 01 23 00 part 19 and zero indicator with stem depressed about .12" (3 mm).
3) Insert adjusting device 108 589 01 23 00 together with dial gauge holder into axle housing. Make sure that stop of adjusting device, with its installed magnets, rests against axle housing and that housing contact surface is free of paint and dirt. Read indicator reading difference between adjusting gauge and gauge block face end. If value is plus, it must be subtracted from result obtained in step 2) and if minus, must be added to above result (example: If measured deviation is + .16 mm, subtract this value from 1.70 mm to obtain 1.54 mm). This result is thickness required shim for all axle ratios except 2.82:1 and 3.27:1.
4) On 2.82:1 axles, an additional 2.00 mm must be subtracted from result obtained in step 3) to arrive at final shim thickness. On 3.27:1 axles, subtract 1.50 mm from result obtained in step 3) to arrive at final shim thickness. Remove all tools from axle housing. Insert calculated shim into axle housing. If necessary, a thicker washer may be ground down to required thickness. Install outer races of bearing in housing using suitable tool (111 589 12 61 00).
5) Lubricate bearings on drive pinion with hypoid gear oil. Insert pinion and new collapsible spacer into housing and install front bearing inner race using suitable tool (111 589 12 61 00). Coat new seal on circumference with sealing compound and press into cover using suitable mandrel (111 589 12 61 00). Coat cover at contact surface with sealing compound and attach to axle housing. Coat running surface of flange with molybdenum disulphide paste and install flange using suitable tool (111 589 12 61 00).
Pinion Bearing Preload - 1) Check that runout of pinion flange does not exceed .001" (.03 mm). If runout is excessive, reposition flange on pinion until runout is to specifications or replace flange. Attach suitable holding wrench (111 589 00 13 00) to flange and screw on slot nut with lock washer. Gradually tighten slot nut while applying light blows against axle housing until torque required to rotate pinion is 12.2-13.9 INCH lbs. (14-16 cmkg) with new bearings or 4.3-8.7 INCH lbs. (5-10 cmkg) with used bearings.
2) Use care not to exceed specified preload. If preload is exceeded, remove pinion from housing and replace collapsible spacer. When specified preload is obtained, make not of torque value for later use. Reinstall adjusting device 108 589 01 23 00 part 05 with dial gauge holder 108 589 01 23 00 part 10 into axle housing and check pinion depth. Reading should be 66.00 mm (67.5 mm on 3.27:1 axle or 68.0 mm on 2.82:1 axle) plus or minus valve engraved on pinion. Maximum error is +.20 mm. If error exceeds this value, pinion must be reshimed and preload reset using new collapsible spacer peening lock plate in flange.
Backlash & Side Bearing Preload - 1) Insert old shim into left support tube bearing flange and install outer race of bearing using suitable mandrel (108 589 00 43 00). Screw threaded ring for adjusting bearing into axle housing about three turns. Press outer race of bearing into axle housing against stop at threaded ring using mandrel. Insert differential case into housing and install bearing flange with left support tube.
2) Screw in threaded ring on bearing in housing by means of suitable socket wrench (108 589 00 07 00) and tighten to a torque of about 25 ft. lbs. (3.5 mkg). Apply several blows with plastic hammer against housing to assist in seating bearings. CAUTION - If tightening threaded ring shows there is no more clearance between ring and pinion gears, back off threaded ring immediately, disassemble rear axle and install thinner shim, then repeat process.
3) Insert measuring device (108 589 03 23 00) into bore of differential and attach dial indicator. ATtach back square to axle housing. Measure backlash at four points with reference to circumference of ring gear by moving dial indicator holder as required. Backlash should be .0063±.008" (.16±.02 mm). If backlash is too high, install a thicker shim. If too low, install a thinner shim. A .004" (.1 mm) change in shim thickness will cause a .003-.004" (.1 mm) change in shim thickness will cause a .003-.004" (.08-.1 mm) change in backlash.

4) Run a tooth contact pattern test and correct as necessary. Readjust bearing preload by tightening or loosening threaded ring until torque required to rotate drive pinion is 17.4-21.7 INCH lbs. (20-25 cmkg) or at least 6.9 INCH lbs. (8 cmkg) over torque required to rotate pinion alone (see step 2) of "Pinion Bearing Preload"). CAUTION - If threaded ring has been screwed out, remove left support tube and remove differential case. Use mandrel to apply several blows against bearing outer race for perfect contact against threaded ring.
Final Inspection and Assembly - 1) Remove left support tube and coat sealing surface with sealing compound and install and tighten bolts. Recheck backlash and torque of entire assembly one more time. Secure threaded ring in housing using one of five different lock plates with tabs set in different locations. Attach selected lock plate and bend at both screw heads.
2) Install slide joint. Attach right support tube and axle suspension carrier to housing. Install both axle shafts and mount struts. Install brake shoes for hand brake and attach brake roller and caliper. Screw in oil cooling pipe and fill axle with oil.


Nissan Altima L32 U32 2008 Repair Manual

Manufacturer: Nissan
Model: Altima L32 U32
Year: 2008

Contains the following information and repairs for:

  • Quick Reference Index
  • Foreword
  • General Information
  • Engine
  • Hybrid
  • Transmission and Driveline
  • Suspension
  • Brakes
  • Steering
  • Restraints
  • Ventilation Heater and Air Conditioner
  • Body Interior
  • Body Exterior, Doors, Roof and Vehicle Security
  • Driver Controls
  • Electrical & Power Control
  • Driver Information and Multimedia
  • Cruise Control
  • Maintenance
  • Power Supply Routing Circuit
  • Fuse Block Junction Box (J/B)
  • Fuse, Fusible Link and Relay Box
  • IPDM E/R (Intelligent Power Distribution Module Engine)
  • Comment Sheet
  • Quick Reference Chart
File Size: 67 MB
File Type: PDF, RAR


Drive Axles Gear Tooth Pattern Inspection

PRELIMINARY INSPECTION
Wipe lubricant from internal parts, then rotate gears and inspect for wear or damage. Mount a dial indicator to housing and check backlash of several points around ring gear. Backlash must be within specifications at all points. If no defects are found, check gear tooth pattern.

GEAR TOOTH CONTACT PATTERN
NOTE - Drive pattern should be well centered on ring gear teeth. Coast pattern should be centered but may be slightly forward tow of ring gear teeth.

Point ring gear teeth with suitable marking compound, then wrap a cloth or rope around drive pinion flange to act as a brake. Rotate ring gear until a clear tooth pattern is obtained. Gear tooth contact pattern will disclose whether correct pinion bearing mounting shim has been installed and drive gear backlash set properly. Backlash between drive gear and pinion must be maintained within specified limits until correct tooth pattern is obtained.

GEAR BACKLASH AND PINION SHIM CHANGES
NOTE - Change in tooth pattern is directly related to change in shim and backlash.

1) With no damage in backlash, moving pinion further from ring gear moves drive pattern toward heel and top of tooth and moves coast pattern toward toe and top of tooth.
2) With no change in backlash, moving pinion closer to ring gear moves drive pattern toward toe and bottom  of tooth.
3) With no change in pinion shim thickness, an increase in backlash moves ring gear further from pinion. Drive pattern moves toward heel and top of tooth, and coast pattern moves toward heel and top of tooth.
4) With no change in pinion shim thickness, a decrease in backlash moves ring gear closer to pinion gear. Drive pattern moves toward toe and bottom of tooth, and coast pattern moves toward toe and bottom of tooth.


Mercedes-Benz 1975-77 Drive Axles Repair Guide

Models Covered:

  • 230
  • 240D
  • 280 Series
  • 300D
  • 450 Series
  • 6.9
DESCRIPTION
Axle assembly is of integral carrier housing, hypoid gear type in which centerline of drive pinion is mounted below centerline of ring gear. Removable rear housing cover permits inspection and service of differential. Some models may also be equipped with limited slip differential. All adjustments, except pinion bearing preload, are performed using shims. Pinion bearing preload is set using a collapsible spacer.
AXLE RATIO AND IDENTIFICATION
All of the above mentioned Mercedes Benz models use the integral carrier rear axle with semi-floating arm rear suspension. Some models also have limited slip differentials. To determine axle ratio, divide number of ring gear teeth by number of pinion gear teeth. Two different size center housing, generally used on smaller vehicles, has breather mounted on end cover and side covers are secured with six bolts. The large center housing, generally used on larger vehicles, has breather located on right side of housing and side covers are secured with eight bolts.
REMOVAL AND INSTALLATION
AXLE DRIVE SHAFTS
Fig. 1 Removing "C" Lock for Axle Shaft
Removal
Removal - 1) Drain lubricant from rear axle. Remove brake caliper and suspend on piece of wire. Remove bolt attaching axle drive shaft to axle shaft. Force axle drive shaft out of axle shaft. If required to aid axle drive shaft removal, loosen upper shock absorber mount and lower suspension arm to stop.
2) Support axle housing and remove rubber mount from body. Lower axle housing slightly. Clean housing and remove rear cover plate. Remove "C" lock holding axle drive shaft to differential side gear. Pull shaft from gear along with spacer ring.


Fig. 2 Exploded View of  Mercedes-Benz Drive Axle Assembly

Fig. 3 Checking Axle Shaft End Play
Installation - 1) Face of universal joint spider carries stamped "R" for right or "L" for left. Make sure correct axle is used on correct side. Place old spacer ring on inner constant velocity joint. Slide axle drive shaft into differential side gear and install new "C" lock into shaft. Check end play between inner universal joint and axle housing. There should be no perceptible end play. In addition lock ring should still turn in groove. If necessary, install a thicker or thinner lock ring to achieve desired results.
2) Completely telescope axle drive shaft and install axle shaft. Tighten securing nut. Mount end cover with suitable sealing compound and tighten bolts. Raise axle housing, install rubber mount and attach to body. Attach brake caliper using lock washer and fill axle with lubricant.
AXLE DRIVE SHAFT RUBBER SLEEVES
Removal - Remove axle drive shaft. Cut stop sleeve of constant velocity joint on beaded edge and pull sleeve from spider. Remove spider from hub along with six balls. Remove lock ring from groove in axle drive shaft and press spider from shaft. Pull stop sleeve and rubber sleeve from shaft. Loosen hose clamps and pull second rubber sleeve across disassembled end of axle drive shaft. Carefully clean joints and check balls and other parts for wear or damage.
Reassembly - 1) Slide new rubber sleeve on shaft up to bead. Place suitable assembly bushing (115 589 01 63 00) on splines to protect against damage. Place new stop sleeve on shaft and press spider on axle shaft. Install locking ring. Assemble universal spider and six balls using suitable magnetic ball holders (115 589 05 63 00) for assistance.
2) Place new sealing rings on universal spider and attach new protective sleeve. Insert complete drive axle into suitable beading tool (115 589 05 63 00) and install split supporting ring. Attach beading ring and bead edge of sleeve while tightening nuts against stop of beading tool. Remove axle from tool and fill constant velocity joint with 8.5 ozs. (250cc) of suitable C-V joint oil. Attach rubber sleeve on stop sleeve and on axle shaft with new hose clamps.
AXLE SHAFT AND BEARING
Removal - 1) Unscrew bolt and force axle drive shaft out of axle shaft, tie axle drive shaft up out of way. Do not allow axle dive shaft to hang freely. Remove brake caliper and rotor and if necessary, parking brake shoes. Using suitable wrench, remove slotted nut from axle shaft while holding shaft with suitable tool (136 589 05 31 00). Remove sealing rings from support housing using screwdriver.
2) Knock axle shaft out of support housing and remove bearing inner race along with spacer sleeve. Force outer sealing ring from support housing and pull outer bearing race out of outer bearing from wheel bearing. Knock outer bearing inner race from axle shaft.
Installation - 1) For identification, axle shafts have a stamped "R" for right or "L" for left. Insure that axle shafts are installed in correct sides. Press inner race of outer bearing onto axle shaft and install both bearing outer races in support housing. Coat seat for outer sealing ring on support housing with sealing compound and install seal making sure that seal rests straight against chamfer at bottom of housing. Fill cavity between two bearing race in support housing with 1.8 ozs. (50 grams) multi-purpose grease.
2) Attach new spacer sleeve to axle shaft and install into carrier housing. Attach bearing inner race for inner bearing to axle shaft. Fill new sealing ring between lips with anti-friction bearing grease and coat with sealing compound on outside diameter. Press bearing inner race and sealing compound on outside diameter. Press bearing inner race and sealing ring into housing. Install seal running ring and screw on new slotted nut.
3) Attach dial indicator holder to support housing and  check end play of axle shaft while tightening slotted nut and rotating axle shaft back and forth. End play should be .0016-.0024" (.04-.06 mm). If slot nut is overtightened, reducing end play to zero, install a new spacer sleeve and retighten slot nut. Lock slot nut by bending into grooves in axle shaft at two points. Install axle drive shaft, brake components and bleed brake system.
PINION FLANGE AND SEAL
Removal - 1) Remove exhaust system and shielding plate, if necessary. Loosen clamping nut and unscrew propeller shaft intermediate bearing from frame. One three-piece propeller shaft, loosen front clamping nut only. Unflange propeller shaft from axle and push forward out of centering alignment.
2) Make sure axle drive shafts are horizontal and that brakes are not dragging and check and record torque required to rotate entire rear axle assembly. Attach holding wrench to flange and loose slotted nut with suitable wrench (115 589 01 07 00). Pull flange from pinion using puller if required. Force seal out of housing using a screwdriver. Check running surface for seal on flange and replace flange if surface is worn.
Installation - 1) Coat new seal on outside diameter with sealing compound and knock in against stop in axle housing using suitable driver (116 589 12 61 00). Attach flange and carefully tighten slotted nut until turning torque for rear axle is equal to torque measured previously. Do not overtighten or a new collapsible spacer will have to be install on pinion.
2) Reconnect propeller shaft and lightly tighten propeller shaft intermediate bearing. Fill axle housing with oil, lower vehicle and move back and forth several times. Tighten clamping nut on universal and propeller shaft intermediate bearing. Reinstall shielding plate and exhaust system, if necessary.
AXLE ASSEMBLY
Removal - 1) Drain oil from rear axle. On vehicles without starting torque compensation, unscrew brake caliper at right and suspend out of way. On vehicles with starting torque compensation, disconnect brake cable control, unscrew holding bracket on support housing, remove rubber sleeve and push cover back. On all models, disconnect axle drive shafts from axle shaft on both sides and force drive shafts out of axle shafts.
2) If necessary, remove exhaust system and shielding plate. Loosen clamping nut and unscrew propeller shaft intermediate bearing on frame. On three-piece propeller shaft, loosen front clamping nut only. Disconnect propeller shaft and push forward out of way. Support axle assembly with jack and suitable holding fixture (115 589 35 63 00 for small center housing. 116 589 02 63 00 for large center housing).
3) Unscrew rear rubber mounting on frame floor, or unscrew socket bolt for rubber mounting on cover of axle housing. On 230 through 280 models, fold back rubber mat in trunk and remove rubber plugs. Unscrew axle housing from rear axle carrier. On all models, lower rear axle housing from rear axle carrier. On all models, lower rear axle and remove along with axle drive shafts. Use care not to let axle drive shafts droop. Unscrew rubber mounting from housing and replace if worn or damage.
Installation - 1) Attach rubber mounting to axle housing and place on jack and holding fixture. Move axle up under vehicle. Mount axle housing to rear axle carrier and tighten nuts. On 230 through 280 models, install rubber plugs and replace trunk floor mat. Install both axle drive shafts into axle shafts and tighten bolts.
2) Lift axle housing up to frame floor and attach rubber mounting to frame. Reconnect propeller shaft and lightly attach propeller shaft intermediate bearing. On vehicles without starting torque compensation, mount brake caliper using new lock washers. On vehicles with starting torque compensation, mount holding bracket for brake cable control to support housing, slide on cover and rubber sleeve, attach cable control and adjust parking brake.
Fig. 4 Removing Differential Assembly
from Housing
3) Fill axle with oil to level of filler hole, lower vehicle. Rock back and forth several times, then tighten clamping nut on propeller shaft and tighten propeller shaft intermediate bearing. Install exhaust system and shielding plate if removed.
OVERHAUL
DISASSEMBLY
1) Clamp axle housing in suitable support so that axle drive shafts are fully supported. Remove rear cover from housing and axle drive shafts from side gears (see "Axle Drive Shafts" under REMOVAL AND INSTALLATION). Remove bolts and push side bearing covers out of housing along with seal rings and shims, mark all parts for correct right and left side reassembly.
Fig. 5 Friction Disc Installation
Sequence
2) Tilt differential case slightly and remove from housing. Mark relative position of ring gear to differential case, remove bolts and carefully force gear from case. To disassemble case, pull roller bearings from case using suitable puller (187 589 05 33 00). Knock holding pin for pinion shaft out of case and remove pinion shaft.
3) On limited slip differentials, insert suitable assembly mandrels (116 589 18 61 00) through case and side gears. Remove pinions with spherical washers, then remove right side gear with friction discs, then repeat procedure for left side. On standard differentials, lift out side gears, thrust washers and spherical washers.
4) To remove drive pinion, remove flange nut and flange. Force pinion out of housing using tool (115 589 00 59 00). Pry seal out of housing with screwdriver. Screw suitable fixture (115 589 01 61 00) to housing and using suitable mandrel (115 589 01 61 06), press front bearing outer race out of housing. Now pull rear bearing outer race out of housing using suitable adapter (116 589 12 61 00 part 7 for small center housing or part 18 for large center housing). Press roller bearing inner race from pinion using suitable press plate (108 589 00 33 00).
Fig. 6 Zeroing Dial Indicator for Pinion Depth
Adjustment
REASSEMBLY AND ADJUSTMENT
Case Assembly (Standard Differential) - 1) Place thrust washers on side gears and insert in case. Insert assembly mandrels (116 589 18 61 00) into side gears and mount both pinions along with spherical washers. Insert dummy pinion shaft (115 589 03 61 00 for small center housing or 116 589 07 61 00 for large center housing) into case to locate pinion gears and spherical washers.
2) Check torque required to rotate side gears. Specified torque is 130-174 INCH lbs. (150-200 cmkg) with spot binding up to 304 INCH lbs. (350 cmkg) permitted with no end play. If necessary, change side gear thrust washers as necessary to achieve this torque value. When side gear preload is correct, insert pinion shaft in place of mandrel, install new clamping sleeve and press bearing inner races on case using suitable mandrel (115 589 04 61 00 for small center housing or 116 589 08 61 00 for large center housing).
Fig. 7 Reading Pinion Height
Case Assembly (Limited Slip Differential) - 1) Mount friction discs on side gears in correct sequence (see illustration). Install left side gear (ring gear side) with discs and insert assembly mandrel (116 589 18 61 00) through case, pinions and spherical washers. Check torque required to rotate side gears. Specified torque is 217-304 INCH lbs. (250-350 cmkg) with no end play. If necessary, change side gear thrust washers as necessary to achieve this torque value. When side gear preload is correct, insert pinion shaft in place of mandrel, install new clamping sleeve and press bearing inner races on case using suitable mandrel (116 589 08 61 00).
Drive Pinion Depth - 10 With dial indicator plunger device 116 589 00 23 00 depressed about .12" (3 mm) by gauge block 116 589 07 21 00 part 8 for small center housing or part 9 for large center housing, zero dial indicator. Press inner tapered roller bearing on drive pinion and place bearing outer race on roller cage of bearing. Insert pinion assembly into measuring device. On pinions from large center housings, place magnetic plate 116 589 01 21 00 part 4 on top of pinion. Place indicator stem on head of pinion or plate and note reading (example 1.50 mm).
Fig. 8 Zeroing Dial Indicator
NOTE - On all 450 Series, the height of the pinion gear head has been increased from 1.477" (37.5 mm) to 1.535" (39 mm). This must be considered when selecting pinion depth adjusting shims. This change was made as chassis and numbers: 0066963 (450 SLC); 017787 (450 SL); and 023515 (450 SE/SEL).
2) Now note adjustment value engraved on pinion shaft in tenths of millimeters (example: +20 = +.20 mm). From value measure above, add adjustment value if plus and subtract value if minus. (example: 1.50 + .20 = 1.70 mm). Insert gauge block holder into axle housing and screw on appropriate gauge block. Insert dial gauge holder 111 589 05 21 00 and zero indicator with stem depressed about .12" (3 mm).
3) Insert measuring device 115 589 00 21 00 part 3 for small center housing or 116 589 01 21 00 part 1 for large center housing together with dial gauge holder into right bore of housing and screw down. Read indicator reading difference between adjusting gauge and gauge block face end. If value is plus, it must be subtracted from result obtained in step 2) and if minus, must be added to above result (example: If measured deviation is +.16 mm, subtract this value from 1.70 mm to obtain 1.54 mm). This result is thickness of required shim.
Fig. 9 Measuring Housing Depth
4) Remove all tools from axle housing. Insert shim of calculated thickness into axle housing. If necessary, a thicker washer may be ground down to required thickness. Install outer races of bearings in housing using suitable installation tool (116 589 11 61 00). Lubricate bearing on drive pinion with hypoid gear oil and insert pinion and new collapsible spacer into hosing.
5) Install front bearing inner race using suitable tools. Coat new seal on circumference with sealing compound  and press into cover using suitable mandrel. Coat running surface of pinion flange with molybdenum disulphide paste and slide flange on drive pinion, making sure alignment marks are lined up.
Pinion Bearing Preload - 1) Check that runout of pinion flange does not exceed . 001" (.03 mm). If runout is excessive reposition flange on pinion until runout is to specification or replace flange. Attach suitable holding wrench (115 589 00 07 00) to flange and screw on new locking slot nut. Gradually tighten slot nut whil turning pinion and applying light hammer blows to axle housing. Continue tightening nut until torque required to rotate housing. Continue tightening nut until torque required to rotate pinion is 10.4-12.2 INCH lbs. (12-14 cmkg) with new bearings or 4.3-8.7 INCH lbs. (5-10 cmkg) with used bearings.
Fig. 10 Measuring Housing Spread
2) Use care not to exceed specified preload. If preload is exceeded, remove pinion from housing and replace collapsible spacer. Again insert measuring device together with dial gauge holder into right bore of housing and place magnetic measuring plate 116 589 01 21 00 part 4 on head of pinion. Dial indicator should read value engraved on pinion shaft. Maximum error is -.0008" (.02 mm). If error is higher, disassemble pinion and install correct shim.
Backlash & Side Bearing Preload - 1) On small center housing axles, press out sealing rings and outer bearing bores from side covers using suitable mandrel (115 589 00 35 00). On large center housing axles, remove sealing rings from side covers using suitable tool (115 589 00 35 00 part 5), then remove bearing outer race with suitable tool (116 589 00 35 00). On all axles, press in new outer races with suitable sleeve (116 589 04 43 00 part 5) and, on small center housing only disc (115 589 00 61 00 part 1).
Fig. 11 Measuring Ring-to-Gear Backlash
2) Coat new seals on outside diameter with sealing compound and press into bearing covers with suitable punch (116 589 05 43 00). Place previously used shims on bearing covers and install new sealing rings in grooves of covers. Carefully clean bore of ring gear and seat on differential case as ring gear is removed from case. Heat ring gear to about 140-158 Degrees F (60-70 degrees C) and install gear on case making sure installation marking are lined up if old ring gear and case is being used. If necessary, tap gear on case using rubber hammer. Tighten ring gear bolts uniformly and in a crosswise pattern.
3) Place differential case into housing. Place suitable assembly fixture (116 589 06 61 00) into housing. Place both bearing covers with shims on centering surface of fixture and slide into housing on same side from which they were removed. Turn both covers so that marking "bottom" ("unten") face downwards. Remove assembly fixture and screw in bearing cover bolts but do not tighten. Mount suitable case spread measuring device (115 589 04 21 00 for small center housing or 116 589 04 21 00 for large center housing) and support (115 589 04 21 00 part 3) on housing and zero dial indicator.
4) Tighten bolts on bearing covers, crosswise, to a torque of 14.5 ft. lbs. (2 mkg). Place spread measuring device on support blocks and measure spread of axle housing. Spread should be.004-.006" (.10-.15 mm) for small center housing or .006-.008" (.15-.20 mm) for large center housing. Adjust size of shims as necessary to achieve specified case spread. Install suitable backlash measuring device (115 589 03 23 00) into right side bearing bore and clamp down.
5) Measure backlash at four points on ring gear. The lowest measured value of backlash should be .003-.0055" (.08-.14 mm). Adjust shims from side to side as necessary to achieve specified backlash. When preload and backlash is correct, install both axle drive shafts with new "C" lock rings. Clean sealing surface on end cover and axle housing and coat with sealing compound. Install cover and tighten bolts.


Mazda 1975-77 Drive Axles Repair Guide

Models Covered:

  • GLC
  • Mizer
  • 808
  • RE Pickup
  • RX-3SP
  • RX-4
  • Cosmo
DESCRIPTION
Axle housing is banjo type with removable differential carrier and semi-floating axle shafts. Ring and pinion are hypoid type, in which centerline of pinion is set below centerline of ring gear. Differential case may be either two pinion or four pinion design. The axle shafts are retained in housing by ball bearing and bearing retainers at axle housing outer ends.
AXLE RATIO AND IDENTIFICATION
All Mazda models use one basic type of rear axle assembly. Any differences in Removal and Installation or Overhaul procedures will be noted where they occur. To determine axle ratio, divide number of ring gear teeth by number of pinion teeth.
REMOVAL AND INSTALLATION
Axle Shafts and Bearings
Removal (All Exc. Pickup) - Remove wheel and tire assembly and brake drum or disc. Remove brake shoes and return springs (drum brake models). Remove center cap adapter (if equipped). Remove brake backing plate and bearing retainer to axle housing. use slide hammer and adapter to remove axle shaft assembly from housing.
Bearing Replacement (All Exc. Pick-Up) - Remove axle bearing and collar using a press and a suitable bearing adapter (49 0259 745). NOTE - If pressure necessary to remove bearing exceeds 10 tons, or if bearing adapter is not available, grind bearing retaining collar down and cut with a chisel to remove. To reassemble, apply a light coat of oil to axle shaft and place bearing retainer and spacer on shaft. Position bearing on shaft with sealed side toward axle shaft flange, then press bearing on shaft until spacer contacts shaft shoulder. Next, press bearing retaining collar on shaft until it seats firmly against bearing. NOTE - Do not press bearing, and collar on shaft at the same time. In addition, if collar is installed with less than 3 tons pressure, replace with a new part.
Installation (All Exc. Pick-Up) - 1) Apply a light coat of grease to oil seal in axle housing. Check axle shaft end clearance as follows: Install backing plate and gasket temporarily and measure depth of bearing seat in axle housing. Then, measure width of axle bearing outer race. The difference between the two measurements indicates the required thickness of shim.
2) Shims are available in thicknesses of .004" (.1 mm) and .016" (.4 mm). After selecting correct shim pack, apply sealant to shims and position brake backing plate and shims on axle housing. Install axle shaft assembly in housing using a new gasket, then install and tighten retainer bolts. At this time, recheck end play; maximum end play allowable is .004" (.1 mm). Install brake shoes, return springs, brake drum, and wheel and tire assembly.
Removal (Pickup) - Remove wheel and tire assembly, then remove brake drum and brake shoes. Remove parking brake cable retainer and disconnect brake lines at wheel cylinders. Remove nuts attaching backing plate and bearing housing to axle housing, then pull axle shaft, backing plate, bearing housing assembly, and shims off axle housing.
Bearing Replacement (Pickup) - Straighten tabs of lock washer, and using suitable spanner wrench (49 0603 622A), remove lock nut and lock washer. Using a puller, withdraw bearing and housing assembly from axle shaft, then remove backing plate. Remove bearing and oil seal from housing. To reassemble, reverse disassembly procedure.
Fig. 1 Axle Shaft Assembly (Except Pickup)
Fig. 2 Axle Shaft Assembly (Pickup)


Installation (Pickup) - 1) Install axle shaft, backing plate, and bearing housing to rear axle housing, temporarily attaching with two bolts and nuts. Mount dial indicator on backing plate and check axle shaft end play. End play should be .002-.006" (.05.-.15 mm).
2) NOTE - If both axle shafts were removed, a special procedure must be followed: The end play for this first axle shaft installed should be set to .026-.033" (.65-.85 mm). The second axle shaft installed should be set to the normal end play of .002-.006" (.05.-15mm).
3) After installing correct shim pack, install and tighten oil attaching bolts and nuts. Install brake shoes and drum. Connect fluid lines to wheel cylinders, adjust brakes, and bleed system. Install and tire assembly.
DIFFERENTIAL CARRIER
Remove & Installation - Raise vehicle until rear wheels are clear of ground. Remove drain plug and drain rear axle lubricant, reinstall plug and tighten. Remove axle shafts. Mark propeller shaft and pinion flange for reassembly reference, then disconnect propeller shaft.Remove carrier attaching nuts and withdraw carrier from axle housing. To install, reverse removal procedure, making sure to refill axle with lubricant.
OVERHAUL
Disassembly
1) Mount carrier in a suitable repair stand. Attaching a dial indicator to carrier (with button of indicator contacting back face of ring gear) and check ring gear deflection. Maximum allowable deflection is .004" (.1 mm); replace ring and pinion if above specification. Punch identification marks on side bearing supports of carrier, differential bearing caps, and side bearing adjuster. Remove adjuster lock plates, loosen bearing cap attaching nuts or bolts, and slightly back off adjusters to relieve preload.
Fig. 3 Measuring Drive Pinion Installed Height
2) Remove bearing caps and adjusters, then withdraw differential assembly from carrier, making sure side bearing races remain with their respective bearings. If necessary for replacement, use a suitable puller and remove side bearings from gear case. Straighten lock tabs, remove ring gear attaching bolts, and separate ring gear from gear case.
3) On all models except RX-4 and Cosmo, drive out differential pinion shaft lock pin with a punch and remove pinion shaft. Rotate pinion gears 90 degrees and remove gears, thrust washer, thrust block (if equipped), and differential side gears. On RX-4 and Cosmo models, remove bolts joining differential case halves and separate case. Remove side gears, thrust washers, pinion gears, and spider.
4) On all models, remove pinion nut and pinion flange. Remove drive pinion and rear bearing assembly, adjusting shims (if equipped), spacer, and bearing collar (if used). NOTE - It may be necessary to tap end of pinion with a soft hammer to remove from carrier. Remove front oil seal and with draw from pinion bearing. Using a press, remove rear bearing from drive pinion, then lift off pinion adjusting shim. If necessary for replacement, use a drift punch and remove pinion bearing races from carrier.
REASSEMBLY AND ADJUSTMENT
Drive Pinion Depth - 1) NOTE - The use of a suitable dial indicator assembly (49 0727 570) and pinion gauging set (49 0305 555), all except B1600; or (49 0603 55A, B1600) is required for this procedure. Install dial indicator on gauge body, place gauge body on a surface plate and preload indicator .04"-.12" (1-3 mm). When preloaded, turn outer ring of indicator assembly to "zero" gauge.
2) Make sure differential bearing bores are free of dirt and burn, then install drive pinion, dummy bearing, and original pinion depth shim into carrier. Place gauge block on pinion and position indicator assembly on black so button of indicator contacts lowest portion of differential bearing bore.
3) Record the amount indicator moves in a "+" (plus) or, "-" (minus) direction from zero. Remove gauging assembly and pinion from carrier. Check rear face of pinion for the machining correction figure. If pinion is marked "+" (plus), SUBTRACT amount specified on pinion from dial indicator reading; if marked "-" (minus). ADD amount to indicator reading NOTE - Figures on pinion are hundredth millimeters.
4) Place dummy bearing and rear pinion bearing on surface plate and compare heights. If pinion bearing is higher than dummy bearing. SUBTRACT difference from dial indicator reading; if pinion bearing is lower than dummy bearing. ADD amount to indicator reading.
5) Select correct pinion depth adjusting shim to be used for reassembly by adding or subtracting the amount determined in steps 2), 3), and 4) from the thickness of the original pinion depth shim used during gauging process. Position correct shim on pinion and install pinion bearing.
Fig. 4 Exploded View of Mazda Rear Axle Assembly Showing Both Two and Four  Pinion Type Differential
                          Pinion Depth Adjusting Shims
                   (All Models Except RX-4 & Cosmo)
Identification Mark                                    Thickness In. (mm)
08..............................................................  .121 (3.08)
11..............................................................  .122 (3.11)
14..............................................................  .124 (3.14)
17..............................................................  .125 (3.17)
20..............................................................  .126 (3.20)
23..............................................................  .127 (3.23)
26..............................................................  .128 (3.26)
29..............................................................  .130 (3.29)
32..............................................................  .131 (3.32)
35..............................................................  .132 (3.35)
38..............................................................  .133 (3.38)
41..............................................................  .134 (3.41)
44..............................................................  .135 (3.44)
47..............................................................  .137 (3.47)
52..............................................................  .139 (3.52)
55..............................................................  .140 (3.55)
58..............................................................  .141 (3.58)
61..............................................................  .142 (3.61)
64..............................................................  .143 (3.64)
67..............................................................  .145 (3.67)
70..............................................................  .146 (3.70)
73..............................................................  .147 (3.73)
Pinion Bearing Preload (W/ Solid Bearing Spacer) - 1) Position drive pinion and rear bearing assembly into carrier, then install bearing spacer and preload shims onto pinion. Install front pinion bearing and pinion flange (do not install oil seal at this time). Install pinion nut and tighten to 110 ft. lbs. (15 mkg) on 1200 models, or 130 ft. lbs.  (18 mkg) on R-100 models.
Fig. 5 Installing Drive Pinion Bearing
Collapsible Spacer
Pinion Bearing Preload (W/ Collapsible Bearing Spacer) - 1) Position drive pinion in carrier and install bearing spacer. Place front pinion bearing in position on pinion gear, hold gear fully forward, and drive bearing over pinion until seated. Apply grease to lip of pinion oil seal and install seal into carrier. Install flange on pinion by tapping with a soft hammer. Install pinion washer and nut. Before tightening nut (when pinion preload is zero), check oil seal drag using a torque wrench. Tighten pinion nut as follows:
Application                                      Ft. Lbs. (mkg)
GLC, Mizer, 808, RX-35P............. 94 (13)
RX-4 & Cosmo...................... 101(14)
RE Pickup...................................... 145(20)
2) With nut tightened, check preload using a torque wrench mounted on pinion nut. If preload is not specified (see Axle Assembly Specifications), continue tightening nut and checking preload until specified preload is obtained. CAUTION - Preload builds quickly. Nut should be tightened a little at a time and preload checked after each slight amound of tightening.
Case Assembly - 1) On all models except RX-4 and Cosmo, install a thrust washer on each differential side gear and install into case. Through openings in gear case, insert pinion gears exactly 180 degrees opposite each other. Rotate pinion gears 90 degrees so holes in gears line up with pinion shaft holes in gear case. Insert pinion shaft through case and pinion gears.
Fig. 6 Installing Pinion Shaft and Lock Pin
2) On RX-4 and Cosmo models, install a thrust washer on each differential side gear and install into case halves. Position pinion gears on spider and install spider into differential case half. Align identification marks, mate case halves, and install and tighten retaining bolts.
3) On all models, check backlash between side gears and pinion gears. Backlash should be less than .004" (.1 mm) ; if not, install selective thrust washers to bring backlash within specifications. Washers are available in thicknesses of .063" (1.6 mm), .067" (1.7 mm), .071" (1.8 mm), .079" (2.0 mm), .083" (2.1 mm), and .087" (2.2 mm). NOTE - Always use same thickness thrust washer for both side gears.
Fig. 7 Installing Differential Assembly in Housing
4) If equipped with thrust block, remove pinion shaft, install thrust block, and reinstall pinion shaft. On all models except RX-4 and Cosmo, drive lock pin into case to secure pinion shaft. Using a punch, stake lock pin hole to prevent pin from working loose. On all models, mount ring gear on case, then install and tighten ring gear attaching bolts. If removed, install differential side bearings.
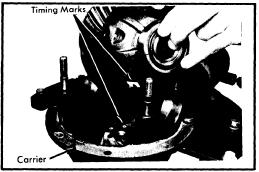
Backlash and Side Bearing Preload - 1) Place differential case assembly into carrier making sure timing marks on ring and pinion gears are aligned. Install bearing adjusters and bearing caps, then tihgten bearing cap nuts or bolts finger tight. Turn adjuster with suitable spanner wrench (49 0259 720) until bearing end play is eliminated and some backlash exists between ring gear and pinion. Slightly tighten one bearing cap nut or bolt on each side of carrier.
Fig. 8  Adjusting Differential Bearing
Preload (Case Spread)
2) Mount a dial indicator to carrier flange so button of indicator contact one of the ring gear teeth at a right angle, then check backlash between ring and pinion gears. Using the spanner wrench, turn both bearing adjusters equally until backlash is as specified in Axle Assembly Specifications.
3) Differential bearing preload (case spread) is obtained by tightening bolt bearing adjusters equally. Tighten adjusters until the distance between pilot section of side bearing caps as specified in Axle Assembly Specifications. Tighten bearing cap nuts or bolts, then recheck backlash adjustment. Make a gear tooth pattern check to insure correct assembly, then install adjuster lock plates on bearing caps.